 One limitation of using MySQL for home use is the lack of an "undo" button. One sloppy MySQL statement can wipe out an entire column of data, or so I found recently. And while MySQL has a variety of backup and restore mechanisms, they do not work if you do not actually use them.
The good news for those running their MySQL databases on DigitalOcean Droplets is that they can restore the database from a DigitalOcean backup, if they are paying for that feature. For $1 a month (currently), DigitalOcean will take a snapshot of your currently running Droplet (which is a Linux distro housed within an Internet-facing virtual server) every seven days, keeping them for about a month.
This approach assumes you haven’t been doing formal MySQL backups, offered by MySQL and other add-on tools. Tsk tsk. This tutorial is forthose lost souls. My admittedly hack-y approach involves making a clone of the latest Droplet from before you made the error, which houses the uncorrupted database, and then copying the appropriate database files back into the current droplet. I’m using MySQL 5.5 for this demo.
![]()
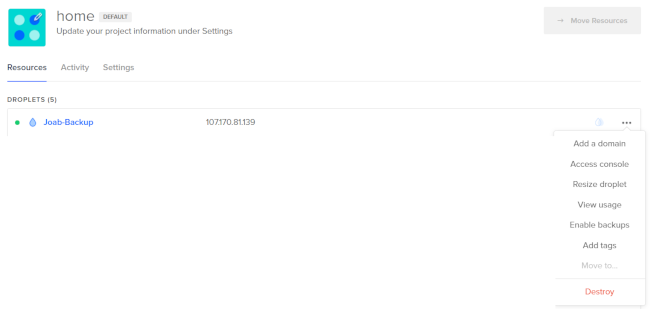
On the Droplets page, click on the Droplet you want to make the backup from. On the menu on the right-hand side, click on backups option, which will give you a list of the backups of this droplet. Click on the backup that was created right before you made the fatal change to your database. This will take you to the Backups page, and under the "More" command box for this droplet, pick the “Create Droplet” option.
Note: You could also replace your current Droplet with the "Restore Droplet" option, but do not use this choice if you only have a select number of files you know you want to restore. Restoring the entire backdrop means all the other changes you made since this backup time will be lost. Also, I haven’t tried this option, but I get the feeling it may interfere with whatever existing log-in process you have set up. A subject for another day.
So, you click on Create Droplet and from here, you will be walked through the same process of creating a new Droplet. You basically want to give the cloned Droplet the same characteristics (CPU type, data center etc) as the original. For the Authentication tab, pick the password option. It’s the least safe, but the fastest—and you will delete this duplicate Droplet as soon as you get the files you need from it. Give it a throw-away name ("Temp-Backup") At the end of this process click on “Create Droplet” button.
Once the Droplet is created, you will be returned to the page with all your Droplets. Go to that Droplet, and look to the menu on the right hand site. Click on “Access Console,” which will give you command access to the newly-created droplet.
The next step is to find the files you need, and copy them back over to the original, working Droplet.
A command line terminal will pop up in the console. Log in under “root” with the password you provided in the setup.
In plain MySQL setups, each database within MySQL gets its own set of files, within its own directory. In my CentOS set up those files are in the /var/lib/mysql, under a directory with the same name as the database itself.
In my case, I am looking for the database table SiteStories within the database site:
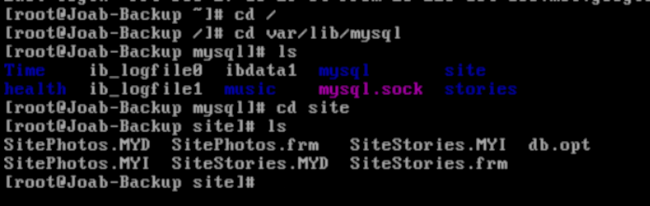
MySQL keeps the contents of each of its databases in a set of files, identifiable by the suffixes:
- [tablename].frm – This file keeps the schema or definition of the table.
- [tablename].myd – This file contains the table data.
- [tablename].myi – This file which contains MyISAM table indices.
- db.opt -- configuration setting for the whole database.
So, the thing to do would be to just copy these data table files from the replica over to the original. This can be done easily with the scp command. This is presuming you have remote ssh login access enabled on the original Droplet.
For purposes of simplicity, I will switch into the directory with these files, and execute this command:.
scp * [username]@[host]:/var/mysql/[database directory]
Where “*” is the name of the file, or files you want to copy; [username]@[host] is where you want to copy the files to (the original Droplet); and the [database directory ] is the database you want to restore.
(Note: Have root access available on any Linux server is generally a bad idea, as it gives attackers an easy lock to crack. So for this to work you may have to transfer the files by way of a regular user account. If you do make sure you fix the file permissions the way they were in the originals, through the chown command. mysql owns this files under the mysql group.)
![]()
One last bit of home repair you may have to do is “repair” the database table. After you move the files, you can log into the mysql console back on the original droplet(“mysql -p”), select the database (“use site”) and check the database (“select * from SiteStories”).
You may get an error message (“MySQL table has marked as crashed and should be repaired”). This is MySQL trying to reconcile the database index, which may have more or fewer entries than the database contents, depending on the changes you made (and will have to restore by hand) since the last backup.
Fortunately, this is readily handled by MySQL’s table repair command (executed from within the mysql program command line, not the Linux command line).
Repair Table [database table name]
And one last thing: Do not forget to destroy the replica droplet, as soon as possible!! This is done back at the DigitalOcean console for Droplets. It will be easy to crack into, and may have some valuable information you wouldn’t want leaked.
And there you go—your database is back to normal. Now go deploy a proper MySQL backup plan, ya lazy sod!