 The Sitch: You just spun up a virtual machine (VM) on a cloud service. Now you want terminal access from your own box. So,
you got to understand how Secure Shell (ssh) works. And how it works for your particular cloud
provider, which is not always the same thing.
The Sitch: You just spun up a virtual machine (VM) on a cloud service. Now you want terminal access from your own box. So,
you got to understand how Secure Shell (ssh) works. And how it works for your particular cloud
provider, which is not always the same thing.
If you want to connect to an Internet-facing VM from an external program (ssh from the command line, or the Putty client for Windows), you must have your own set of ssh keys, both a private key and a matching public key. The cloud provider will probably provide some easy(ish) ways to set this up. But for long-time usage, you should understand how to set it up yourself.
Backup, Jack: What is SSH, Anyway?
In Ye Olden Days, you used telent to jumped from your terminal's command line to some remote computer's command line. It's easy enough to use, but not very secure.
Like Telnet, ssh gives you access to a command line from a remote host, using a technique called public-key cryptography. Unlike Telnet and its unsecured passwords, SSH uses a pair of keys to create an encrypted connection between the two computers. One key is a public, which can be freely shared, so that other parties can encrypt their messages that only YOU can open, with your private key, which you should keep in a safe place. This private key is extremely hard to crack, harder than a password at any rate.
How does this public/private key combo work in SSH, for connecting to a VM? The VM gets the public key and the end-user the private key. On the VM, each public key must be stored in the home directory of the user that will shh in using that key.

ssh operates on a client-server architecture: For a system, such as a virtual machine, to support SSH, it requires both an ssh client on the user side (the "client") and sshd (SSH Daemon) for itself (the "server," or "host," the VM in this case). The daemon listens for requests coming in over the network (usually through port 22). It consults with an SSH configuration file, also on the server, where you specify options, such as whether to allow outside log-ins, or to restrict them to known clients.
To make this happen on your VM, first make sure sshd is up and running on the host. This is usually the case in most Linux installs (To check centOS, for instance, run service sshd status at the command line). With sshd running, you want to install a public key in an .ssh directory under the home directory of the user that wishes to ssh in: In the .ssh directory, you create a text file called authorized_keys. In this text file goes your public public key info.
Now, to create your public key: Go back to your computer, and create a public/private key combo for the user to access this VM. On Linux, this is done directly in ssh. By Windows, you would most likely use Putty for ssh access and a key generator called Puttygen to actually create the private key and the public key (Warning: Before generating the key in Puttygen be sure to chnage the "Key Comment" field to the user name you wish to access the host with).
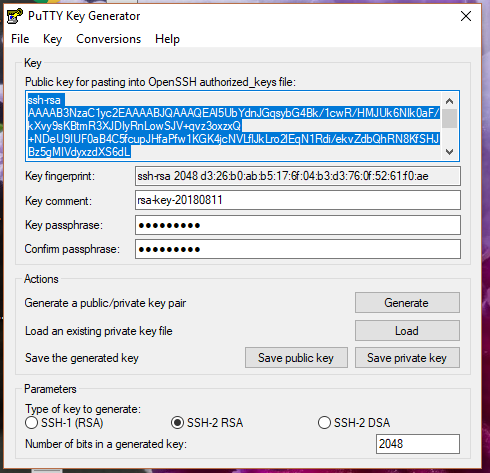
Puttygen will display the public key, which you need to copy and paste -- in its entirety, and with no line breaks -- in the authorized_keys file.
Remember that file? Anyway, to ssh into this virtual box you enter into your ssh client the address, [USERNAME]@[HOST-IP-ADDRESS],
specifying port 22 and the location of your private key (in Putty under the connection-ssh-auth subcategory).
Get a Private Key For Your New Instance

Amazon Web Services: To log in to your instance, you must create a key pair, specify the name of the key pair when you launch the instance, and provide the private key when you connect to the instance.
On AWS you should create a key pair first -– before creating an instance -- so when you are configuring your launch, you will have your key an option. Before you launch a new instance, create a key-pair, specify the name for the key-pair and download the private key (.pem) file on your computer. Then, when you go through the configuration steps be sure to pick that key out of the options AWS provides. Oh, and don’t skip over those manual configuration steps either. In particular, be sure to configure to allow for inbound SSH traffic (basically open port 22) – though you can do this later by editing the Security Group for that instance.
OK, with these elements all in place you now need to ssh into the virtual machine using, if you’re on Windows, Putty. If you are Linux, the use the built-in ssh, cuz it's all Linux at this point. As an alternative, there is also Git For Windows, which includes built-in ssh capabilities (I haven't tried it yet).
Soooo...Putty does not except the .pem format that your private key arrived encased within. So you must open the .pem file in Puttygen, and then save it as a .ppk file (Don’t try opening it with another program).
To log into your VM using Putty or ssh, you then need the IP address of the virtual machine (from the console), and a user name, which differs from distro to distro – the documentation should tell you what the user name is. For RHEL’s case it was ec2-user. Putty requires the log-in address ‘ec2-user@x.x.x.x” the x.x.x.x being the IP number of your VM. The settings should be for SSH on port 22. Under the “auth” tab, there is a place to put the location of the private key. Check “Allow Agent Forwarding” if you’ll be communicating with other VMs from that VM.
With all these elements in place, you should be able to log in through Putty. If you add a keyphrase to your key set, the key will be encrypted on your local host, eliminating the possibility someone getting into your computer and misusing key. If you lose the key, you could always do console access from the Web dashboard and set up a new key. But it is your Web access that is the single-point of failure. So you have to think about how you want to architect your SSH.
With the Google Cloud, you have the option of adding in a public key through the console of the running VM. This is really good news given that Google's documentation on how to add your own public keys to your VM manually is pretty atrocious). From the console, you click on the instance, hit the edit button, then, under the ssh option, paste in the key. Google will insert it into the home directory's authorized_keys file itself.
Learn more about SSH here...
